Login with Bootstrap Modal using jQuery AJAX in PHP
- Tech Area
- December 23, 2023
In this tutorial, We will learn how to login with modal using JQuery AJAX in PHP.
Files used in this tutorial:
1- connection.php (database connection file)
2- index.php (login form)
3- fetch-data.php (fetch data)
Below are the step by step process of how to create bootstrap modal for login using Jquery AJAX.
Step 1: Create a Database connection
In this step, create a new file connection.php to create database connection.
connection.php
<?php
$server = "localhost";
$username = "root";
$password = "";
$database = "college_db";
$conn = mysqli_connect("$server","$username","$password");
$select_db = mysqli_select_db($conn, $database);
if(!$select_db)
{
	echo("connection terminated");
}
?>
Step 2: Create index.php
In this step, create a new file index.php. This is the main file used to implement AJAX to login user with bootstrap modal using AJAX in PHP and MySQL.
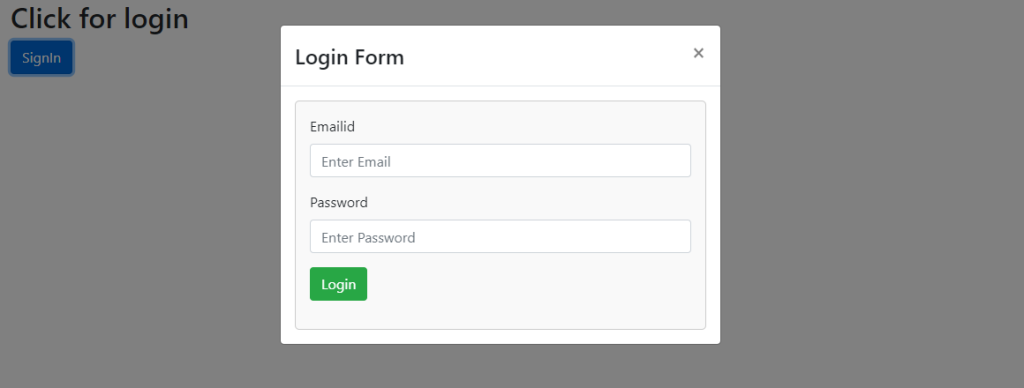
This screenshot shows the login form using bootstrap modal.

index.php
<html>
<head>
<title>Login Form</title>
<link rel="stylesheet" href="https://cdn.jsdelivr.net/npm/bootstrap@4.6.2/dist/css/bootstrap.min.css">
<script src="https://cdn.jsdelivr.net/npm/jquery@3.7.1/dist/jquery.slim.min.js"></script>
<script src="https://cdn.jsdelivr.net/npm/popper.js@1.16.1/dist/umd/popper.min.js"></script>
<script src="https://cdn.jsdelivr.net/npm/bootstrap@4.6.2/dist/js/bootstrap.bundle.min.js"></script>
</head>
<style>
.box
{
width:100%;
max-width:600px;
background-color:#f9f9f9;
border:1px solid #ccc;
border-radius:5px;
padding:16px;
margin:0 auto;
}
.msg
{
color: red;
font-weight: 700;
}
</style>
<body>
<div class="container">
<h2>Click for login</h2>
<!-- Button to Open the Modal -->
<button type="button" class="btn btn-primary" data-toggle="modal" data-target="#myModal">
SignIn
</button>
<div class="modal" id="myModal">
<div class="modal-dialog">
<div class="modal-content">
<div class="modal-header">
<h4 class="modal-title">Login Form</h4>
<button type="button" class="close" data-dismiss="modal">×</button>
</div>
<div class="modal-body">
<div class="box">
<div class="form-group">
<label for="email">Emailid</label>
<input type="text" name="email" id="email" placeholder="Enter Email" class="form-control" required />
</div>
<div class="form-group">
<label for="password">Password</label>
<input type="password" name="pwd" id="pwd" placeholder="Enter Password" class="form-control"/>
</div>
<div class="form-group">
<input type="submit" id="login" name="login" value="Login" class="btn btn-success" />
</div>
<p class="msg" id="res"></p>
</div>
</div>
</div>
</div>
</div>
</div>
</body>
</html>Now use jquery AJAX script.
<script src="https://code.jquery.com/jquery-3.7.1.js"></script>
<script type="text/javascript">
  $(document).ready(function(){
    $("#login").on("click", function(){
      var email = $("#email").val();
      var password = $("#pwd").val();
      if(email=='' || password=='')
      {
        $("#res").html("Both fields are required!");
      }
      else
      {
        $.ajax({
          url: 'fetch-data.php',
          method: 'post',
          data: {emailid: email, pwd: password},
          success: function(data)
          {
            $("#res").html(data);
          }
        });
      }
    });
  });
</script>
Step 3: Create new file for login user
In this step, create a new file fetch-data.php. This file used to login user.
fetch-data.php
<?php
require_once('connection.php');
$email = mysqli_real_escape_string($conn, $_POST['emailid']);
$pwd = md5(mysqli_real_escape_string($conn, $_POST['pwd']));

$fetch_data = mysqli_query($conn, "select * from tbl_registration where emailid='$email' and password='$pwd'");
$row = mysqli_num_rows($fetch_data);
if($row>0)
{
	echo "Login Successful!";
}
else
{
	echo "Wrong Credentials!";
}
?>
Download Source Code
Join 10,000+ subscriber
